

When it comes to managing the size of your video files, the Zipping Method provides a simple yet effective solution. ZIP archives have been widely used for years, not only for combining files but also for compressing them. Imagine these archives as virtual bundles that help tidy up your content while also making it more manageable to share and store. If you’ve been searching for a quick way to compress video, this method might be just what you need.
Let’s dive into the steps for creating a compressed ZIP archive for multiple videos on your Windows operating system. As you follow these instructions, you’ll find that organizing your video files and reducing their size can be accomplished with ease.
Organize Your Videos: Start by gathering the videos you wish to compress into a single folder on your PC. This step streamlines the compression process and ensures you have all your files in one place.
Select and Compress: Once you’ve organized your videos, navigate to the folder containing them. Now, select all the videos you want to compress. With the videos selected, right-click on any one of them. From the context menu that appears, choose “Send to” and then “Compressed (zipped) folder.”
Create the Archive: Windows will now create a new compressed ZIP archive within the same folder as your videos. This archive acts as a container that holds your selected videos while also reducing their overall size. It’s important to note that this method might not drastically reduce the size of highly compressed video codecs like H.264 or HEVC, as they are already optimized for minimal size.
If you’re interested in more advanced options for compressing videos, you might want to explore the offerings of freesoftware.vn. This website provides a range of software tools designed to simplify various tasks, including video compression. By utilizing their resources, you can further customize your compression process to align with your specific needs.
Stay tuned as we move on to explore other methods for compressing videos on your Windows system. Each method offers its own unique advantages, allowing you to choose the one that suits you best. Remember, video compression doesn’t have to be a complex endeavor – it can be a smooth and efficient process that enhances your video management experience.
I. Introduction
A. Addressing the Challenge of Large Video File Sizes
1. Explanation of the increasing prevalence of large video files
2. Impact on storage, sharing, and playback
B. Exploring Solutions: Video Compression
1. Definition and purpose of video compression
2. Significance of reducing video file sizes while maintaining quality
3. Brief mention of the methods and tools covered in the guide
II. Compressing a Video on Windows
A. Zipping Method Compress video – Online video cutter
1. Understanding ZIP Archives for Compression
– Definition of ZIP archives as a method to combine and compress files
– Mention of their widespread use for file management and sharing
vbnet
Copy code
2. Step-by-Step Guide to Creating a Compressed ZIP Archive
a. Organizing Videos in a Single Folder
– Suggest placing multiple videos in a single folder on the PC
b. Selecting and Compressing Videos
– Instructions for selecting videos within the folder
– Right-clicking to access context menu and choosing “Send to > Compressed (zipped) folder”
c. Creation of New Archive
– Explanation of Windows creating a compressed ZIP folder
– Location of the archive saved in the same folder as videos
3. Limitations of Additional Compression for Highly Compressed Codecs
– Clarification that some video files are already compressed using codecs like H.264 or HEVC
– Minimal impact of zipping on file size due to existing compression
B. Built-In Video Editor Method
1. Introduction to Windows’ Integrated Video Editor:
Windows’ video editor isn’t just a basic tool – it’s a powerful utility that empowers you to edit and modify your videos. In this case, it serves as an effective means to compress your videos while preserving as much quality as possible. Whether you’re working with a large video file or aiming to optimize videos for sharing, this method offers flexibility and customization.
2. Steps to Compress a Video Using the Video Editor:
Search and Open: Start by searching for “Video Editor” using the Start Menu on your Windows system. Once you find it, open the app.
Create New Project: Within the Video Editor app, choose “New video project.” Provide a name for the project if desired.
Import Video: Click the “+ Add” button and import the video you want to compress. You can select the video from your PC, photo collection, or even the web.
Add to Storyboard: Right-click on the video you imported and select “Place in the storyboard.” This action adds the video to the editing timeline.
Adjust Video Quality: Click on “Finish video” located in the top-right corner. A dropdown menu labeled “Video Quality” will appear. Here, you can adjust the video quality, which directly impacts the resulting file size. Lower quality settings result in smaller file sizes.
Export: Once you’ve adjusted the video quality settings, click “Export” to initiate the compression process. The video editor will create a compressed version of your video according to your chosen settings.
3. Highlighting Options to Adjust Video Quality and Resolution:
When you choose to compress a video using the built-in video editor, you gain the advantage of fine-tuning the process. The “Video Quality” dropdown menu provides various resolution options, enabling you to choose the right balance between quality and file size. Keep in mind that selecting a lower resolution may reduce the video’s overall quality, so it’s essential to find the sweet spot that meets your requirements.
C. VLC Media Player Method Compress video – Online video cutter
1. Introduction to VLC Media Player as a Compression Tool:
VLC media player’s capabilities extend beyond video playback. It also offers features that enable you to compress videos using a variety of codecs. This method is particularly useful if you’re seeking a reliable way to reduce the file size of your videos while maintaining an acceptable level of quality.
2. Steps to Use VLC to Compress Videos Using Different Codecs:
- Open VLC: Launch VLC media player on your Windows system.
- Access Conversion Menu: Click on the “Media” menu at the top of the VLC player interface, and then select “Convert/Save.”
- Add Video: In the “Open Media” window, navigate to the “File” tab and click the “Add” button. Select the video file you want to compress.
- Choose Compression Profile: Once the video is added, click the “Convert/Save” button at the bottom of the window.
- Select Codec: In the “Convert” window, you’ll see a dropdown menu labeled “Profile.” This is where you can choose a compression profile or codec that aligns with your compression goals. Selecting a codec will determine the level of compression applied to the video.
- Set Destination and Start: After selecting a compression profile, specify the destination folder where the compressed video will be saved. Then, click the “Start” button to begin the compression process.
3. Mention of Potential Trade-off Between Quality and File Size:
It’s essential to be mindful of the trade-off between video quality and file size when using VLC to compress videos. While the compressed video will take up less space, there may be a reduction in overall quality. The extent of this reduction depends on the codec and compression settings you choose. Therefore, it’s advisable to experiment with different codecs and settings to strike the right balance that meets your preferences and requirements.
As you explore the various methods for compressing videos, consider the resources available at freesoftware.vn. Their collection of tools can complement your efforts, providing you with a comprehensive toolkit for efficient video management. With the VLC media player method in your repertoire, you’ll find that video compression becomes an effective and dynamic process that aligns with your needs.
Continue reading to explore additional methods for compressing videos on your Windows system.
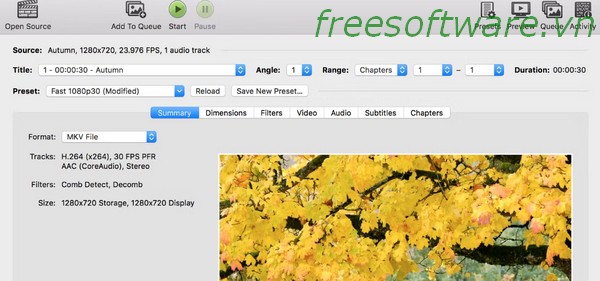
III. Compressing a Video on a Mac Compress video – Online video cutter
A. QuickTime Player Method
If you’re a Mac user seeking a straightforward method to compress your video files, the QuickTime Player method is here to save the day. QuickTime Player, a built-in application on Mac systems, offers a simple yet effective way to reduce the file size of your videos while maintaining a level of control over the process.
1. Explanation of Using QuickTime Player for Video Compression:
QuickTime Player isn’t just a tool for playing videos – it’s also equipped with basic video editing features, including the ability to adjust video quality and file size. By utilizing this feature, you can make your videos more manageable without the need for external software.
2. Steps to Reduce Video File Size Using QuickTime Player:
Open the Video: Start by opening the video you want to compress using QuickTime Player. You can usually do this by double-clicking the video file.
Access Export Options: Once the video is open, navigate to the “File” menu and select “Export As.”
Choose Export Settings: In the “Export As” dialog, you’ll have the option to choose various export settings. Select the format you want the compressed video to be in. Additionally, you can choose the desired video quality, which will impact the resulting file size.
Adjust Quality and Size: Under the format options, you’ll notice a slider that allows you to adjust the video quality. As you lower the quality, you’ll notice the estimated file size changing accordingly.
Select Destination and Export: Once you’re satisfied with the quality and estimated file size, choose a destination folder where the compressed video will be saved. Then, click the “Save” button to start the compression process.
3. Mention of Simplicity and Built-In Nature of This Method:
One of the advantages of the QuickTime Player method is its simplicity and accessibility. QuickTime Player is a native application on Mac systems, meaning you don’t need to install any additional software to compress your videos. This built-in feature provides a user-friendly way to manage your video files without the need for external tools.
As you explore video compression options on your Mac, consider the convenience of using QuickTime Player for basic compression needs. For those seeking more advanced options or additional tools, resources from freesoftware.vn can supplement your efforts, ensuring you have a comprehensive set of tools at your disposal.
Continue reading to discover other methods for video compression on your Mac system.
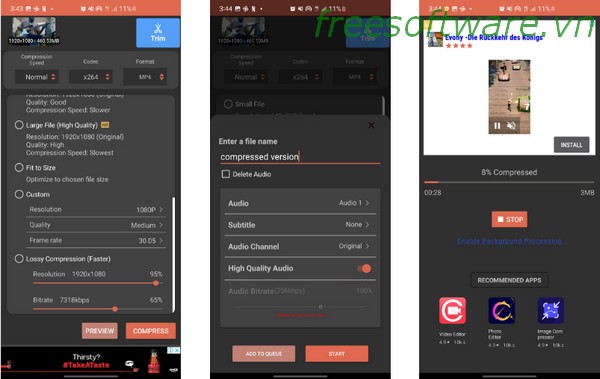
B. External Method for Advanced Users
While the QuickTime Player method offers simplicity and convenience, advanced users seeking greater customization and flexibility have the option to explore external methods. These methods often provide a wider range of settings and options to fine-tune the compression process according to your specific needs.
1. Introduction to External Methods for Advanced Users:
For users who are comfortable with more intricate processes and desire a higher level of control over video compression, external methods offer a robust solution. These methods involve using third-party software applications that provide advanced compression features beyond what’s available in built-in tools.
2. Mention of Customization and Flexibility in External Methods:
External compression tools empower you to tailor the compression process according to your preferences and requirements. These tools typically provide a variety of settings, such as adjusting video bitrates, resolutions, and specific codec configurations. This level of customization ensures that you can optimize the video’s quality and file size based on your intended use.
While external methods may require a bit more familiarity with video compression concepts, they offer a rewarding experience for those who enjoy exploring advanced settings and achieving precise results. The customization and flexibility offered by these tools enable you to strike the perfect balance between video quality and file size, catering to your specific goals.
As you consider external methods for compressing videos on your Mac, remember that freesoftware.vn is a valuable resource for discovering software tools that can enhance your video management efforts. Whether you’re a beginner seeking simplicity or an advanced user craving fine-tuned control, exploring different methods will ultimately lead you to the solution that best aligns with your preferences and needs.
Keep reading to explore the concluding section and gather insights on choosing the right compression method for your Mac system.
IV. Conclusion
As we conclude our exploration of video compression methods, it’s important to reflect on the techniques we’ve discussed and understand how each method aligns with your unique needs and preferences. Video compression plays a pivotal role in managing file sizes, enabling smoother sharing, storage, and playback experiences. Let’s recap what we’ve learned and reiterate some essential considerations.
A. Recap of Methods Covered for Video Compression:
Throughout this guide, we’ve delved into three distinct video compression methods for both Windows and Mac systems. From the Zipping Method and the Built-In Video Editor Method to the VLC Media Player Method and the QuickTime Player Method, you’ve had the opportunity to explore a range of approaches. Each method offers its advantages, catering to different levels of user expertise and desired outcomes.
B. Reminder of the Trade-offs Between Quality and File Size:
When compressing videos, it’s crucial to acknowledge the trade-off between video quality and file size. While methods like zipping, built-in editors, and media players provide various ways to reduce file size, some degree of quality reduction may occur. The extent of this reduction depends on the compression settings you choose. Finding the balance that meets your requirements is key to achieving satisfactory results.
C. Encouragement to Choose the Method That Suits Your Needs:
As you navigate the world of video compression, remember that your choice of method should align with your goals. If simplicity and ease are your priorities, the built-in tools like Windows’ video editor or Mac’s QuickTime Player can serve you well. On the other hand, if you seek advanced control and customization, exploring external tools and resources might be the path for you.
Whether you’re a beginner or an experienced user, embracing video compression will undoubtedly enhance your video management experience. By selecting the method that resonates with you, you can confidently manage your video files, making them more accessible, shareable, and efficient.
Thank you for joining us on this journey of understanding how to compress videos and reduce file sizes. As technology continues to evolve, the methods and tools available will evolve too. Stay curious, explore new horizons, and make the most of the resources at your disposal.
Remember, the choice is yours – the right video compression method awaits you based on your preferences and goals.
| Please note that all information presented in this article has been obtained from a variety of sources, including wikipedia.org and several other newspapers. Although we have tried our best to verify all information, we cannot guarantee that everything mentioned is accurate and 100% verified. Therefore, we recommend caution when referencing this article or using it as a source in your own research or report. |


